빠르고 정확한 진단과 효과적 치료 필요
<지난호에 이어서>
■ Preparation
수술하기 전에 catheters, wire, port들이 개통성을 유지하고, 젖어 있게 flushing을 실시하였다. 왼쪽 신장과 방광을 노출시키기 위하여 정중 절개를 실시하였다.
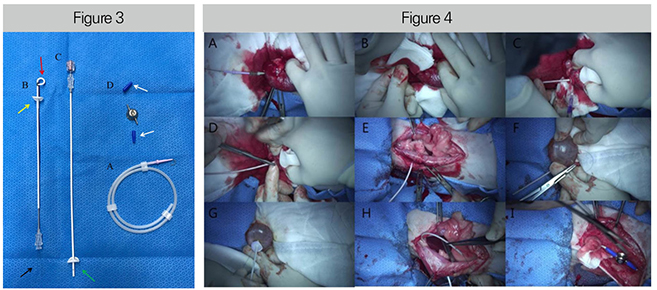
[Figure 4] 정중 절개를 하고, 노출시킨 신장을 고정하고, 신장의 등쪽면에서 신우를 향해서 자입하였다. Catheter sheath를 남기고 needle을 제거 하였다. IV catheter sheath를 통하여, “J”-tipped guide wire를 신우를 향하여 삽입하였다. Guide wire를 따라서 locking-loop nephrostomy catheter를 신우에 장착 하였다. Locking-loop nephrostomy catheter의 silicon sleeve를 밀어 넣고, Silicone/Dacron cuff를 renal capsule에 sterile tissue glue(GS glue stitch)를 이용하여 장착시킨다 (C). Hemostats를 이용하여 복벽에 stab incision을 시행하였다. Stab incision 부위로 kidney catheter를 복벽 바깥쪽으로 꺼낸 후 caudal port와 연결시킨다 (D, E). 방광의 apex에 purse string suture를 실시하였다 (F). 11호 blade를 이용하여 purse string suture의 가운데에 stab incision을 하였다. Bladder catheter를 stab incision한 부위로 삽입하면서, hollow trocar와 sharp stylet을 방광 안쪽에 위치시켰다. Purse string suture를 방광과 고정시킨다. Silicone/Dacron cuff를 방광에 봉합하고, tissue glue를 적용한다 (G). 마찬가지로 bladder catheter를 복벽 바깥쪽으로 꺼낸 후 cranial port와 연결시킨다 (H, I).
Nephrostomy access in the kidney(Figure 4)
신장의 capsule이 노출 되게 peri-renal fat을 왼쪽 신장의 caudal pole에서 부드럽게 분리하였다.
18 gaze IV catheter(Becton Dickinson Korea Ltd.)를 확장된 renal pelvis를 향하여 오줌이 노출될 때까지 자입하였다.
Fluoroscopy(GE healthcare, OEC® 9800)를 통하여 pyelogram을 실시하였다. Fluoroscopic guidance를 하면서 0.035” angled hydrophilic guidewire를 IV catheter를 통하여 renal pelvis주위로 looping이 되게 renal pelvis를 향하여 진입시켰다(Figure 3-A).
18 gaze 카테터를 제거하고, hemostat으로 wire를 고정하였다. Locking loop nephrostomy catheter(Figure 3-B)를 guidewire 위로 통과시키고, renal pelvis로 진입시켰다.
Fluoroscopy 상에서 renal pelvis 안에서 카테터가 보일 때, hollow trocar(Figure 3, red arrow)를 약간 당기면서 locking string(Figure 3, black arrow)을 잡아당겨서 고정시켰다.
Silicone/Dacron cuff와 silicone sleeve(Figure 3, yellow arrow)를 renal capsule로 전진시키고, sterile tissue glue(GluStich, GS glue stitch)가 Dacron을 capsule에 붙이는데 사용되었다.
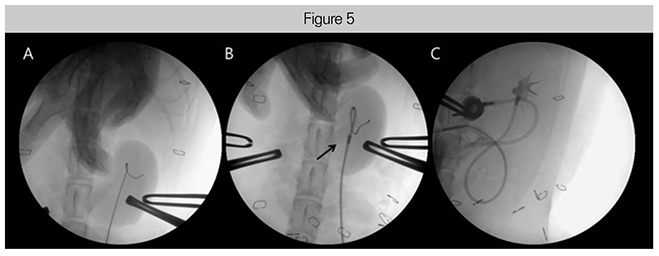
The Modified-Seldinger technique being used for locking loop nephrostomy access (Figure 5)
18 gaze IV catheter가 renal pelvis의 caudal pole로 진입한 뒤 0.035””J”-tipped guide wire가 catheter를 통하여 진입 되었고, 확장된 renal pelvis에서 coiled 되었다(Figure 5-A).
Locking loop nephrostomy catheter가 guide wire 위로 진입 되었고, renal pelvis 안의 hollow cannula가 renal pelvis 안에서 wire 바깥에서 꼬여 있는 형태를 유지시켰다(Figure 5-B).
Radiopaque marker는 multi-fenestrated loop의 끝을 의미하는데, 이 maker를 통하여 entire loop가 renal pelvis 안에 있음을 확인했다(Figure 5-B, black arrow).
Leakage와 catheter 위치의 적정성을 확인하기 위하여 pyelogram이 실시 되었다. Maker를 통하여 pigtail catheter loop가 확장된 pelvis 안에 잘 고정이 되었는지 확인하였다(Figure 5-C).
Placing the cystoscopy catheter(Figure 4)
Purse string suture를 방광의 apex에 만들어 주었다. 11호 blade를 이용하여 purse string 가운데로 stab incision을 실시하였다. Stab incision 한 곳으로 bladder catheter를 진입 시켜서 hollow trocar와 sharp stylet(Figure 3, green arrow)이 들어가도록 하였다.
Purse string suture를 catheter 주위에 고정 시키고 결찰하였다. Silicone/Dacron cuff를 2곳에서 봉합하였다. Tissue glue를 적용하여 Dacron cuff를 방광의 serosal surface에 고정시켰다. 방광의 벽과 catheter를 고정 시키기 위하여 2곳에서 더 봉합을 실시하였다.
Placing the catheters through the body wall(Figure 4)
왼쪽 복벽의 incision 부위로부터 ventral abdominal fat을 분리하였다. Small hemostats를 이용하여 stab incision을 복벽을 통하여 만들어 주고, kidney catheter가 통과될 길을 만들었다.
Kidney catheter는 port(Figure 3-D)의 caudal에 연결되었다. Body wall을 뚫은 hemostat을 이용하여 catheter 끝 수준에서 string을 잡고 복벽 바깥으로 잡아 당겼다. Rectus muscle을 통하여 string과 catheter를 다시 한 번 잡아 당기고, locking string을 유지시켰다.
그리고 blue boot(Figure 3, white arrows)를 좁은 면이 먼저 들어가게 하여 nephrostomy catheter 위로 장착 시켰다. String을 shunting port 위에 위치한 first rung of the barb에 끼웠다. catheter는 lock 상태로 유지시켰다. String을 hemostat의 바깥쪽에서 잘랐고, 남은 string이 없게 하였다.
Catheter를 the other barb에 끼워 넣고, junction에 blue boot를 잡아 당겼다. Junction 부위에 string이 보이는지 다시 한 번 확인하였다.
같은 방법으로 bladder catheter를 복벽 밖으로 꺼낸다. Bladder catheter는 port의 cranial aspect로 연결 되어야 하기 때문에 incision site는 port의 cranial part이다.
Port는 복벽에 녹지 않는 봉합사를 이용하여 4 eyelets에 봉합한다. Huber needle이 port의 silicon diaphragm을 통하여 삽입되고, port의 leak과 patency를 testing 한다.
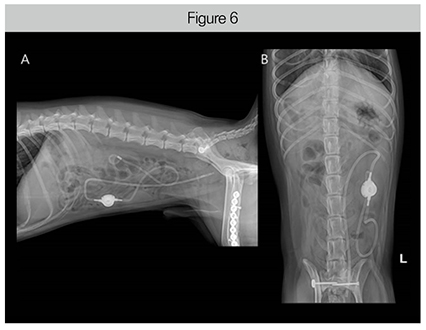
수술 후 31일이 지났을 때 환자에 대한 평가가 이루어졌다. SUB는 잘 유지되고 있었으며, 조영 검사상 어떠한 leakage도 발견되지 않았다(Figure 6). <다음호에 계속>